|
The following user requirements should be confirmed before users begin to use the FamilyMetrics system: 1. Users are using Microsoft's Internet Explorer (IE) web browser. This application comes with all versions of the Windows operating system. 2. Inspect the Browser to ensure that standard menus and navigational toolbars appear correctly. · The toolbar across the top of the user's screen should contain the following main options: File, Edit, View, Favorites, Tools, and Help. · The standard buttons should include: Back, Forward, Stop, Refresh, Home, etc. · The user has the Address bar. · The user has limited extra buttons and links. An efficient Internet navigation toolbar may include a search bar such as Google or Yahoo! but often extra buttons and search bars reduce speed and cause conflicts with navigation settings. 3. The following IE settings have been applied: a. Browser version should be 6.0 or later and have the latest service packs and security patches applied
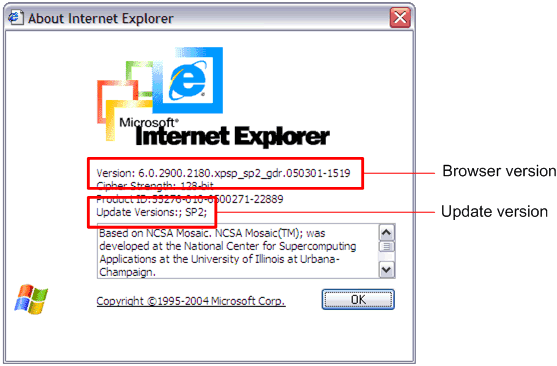
· Go to Help > About Internet Explorer on the top menu bar of the browser. · A pop up window will then appear with information pertaining to the version of Internet Explorer that the user is currently using. In this window, find Version and check that the version is at least 6.0 and that Update Versions is SP1, SP2 or greater.
b. The browser's cache has been cleared
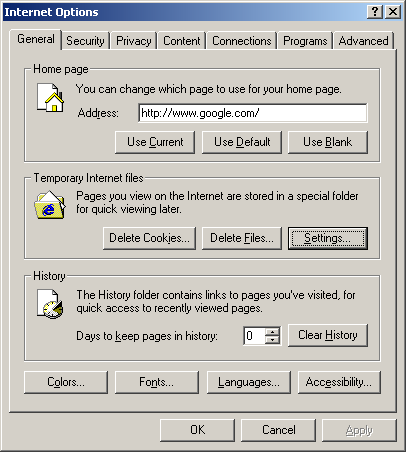
· Go to Tools > Internet Options · Select the General tab · Click the Delete Cookies and Delete Files buttons. Note that this may take a few moments and an hourglass may appear if these actions have not been completed recently.
c. Browser always retrieves the most current version of the site
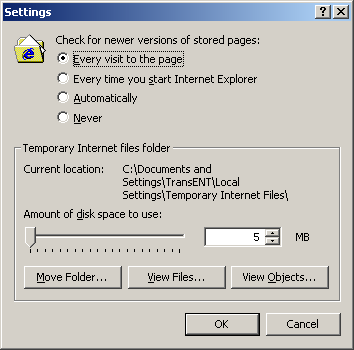
· Go to Tools > Internet Options · Select the General tab · Under Temporary Internet Files, click the Settings button · Under Check for newer versions of stored pages select the Every visit to the page radio button · Under Temporary Internet files folder input five (5) in the Amount of Disk Space to Use field · Click the OK button
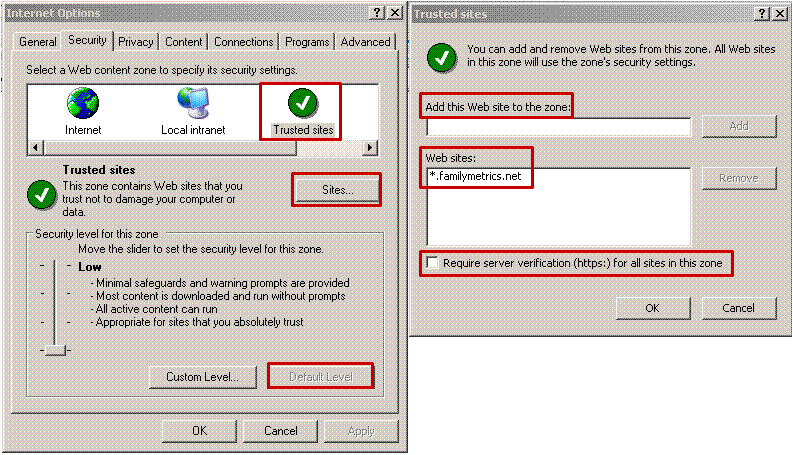
d. Specify Security Settings for Web content zones and Trusted sites
· Go to Tools > Internet Options · Select the Security tab · Click on each content zone (there are four total) under Select a Web content zone to specify its security settings, and Click the Default Level button under Security level for this zone for each zone selected.
· Go to Tools > Internet Options · Select the Security tab · Under Select a Web content zone to specify its security settings select Trusted sites (zone) · Click on the Sites button · In the Trusted sites window uncheck the box at the bottom for Require server verification (https:) for all sites in this zone · Under Add this Web site to the zone type *.familymetrics.net Note that the “*” symbol can be made by holding the Shift key and pressing the 8 key. · Click the Add button to the right which will add the entry to the field under Web sites · Click the OK button
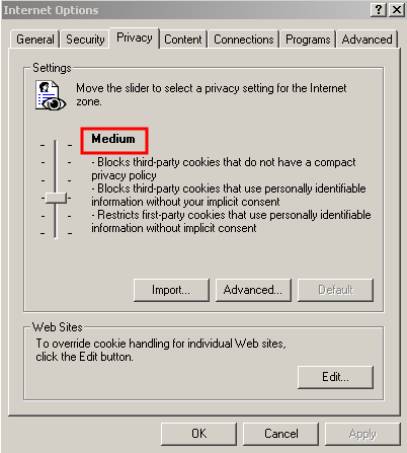
e. Privacy Settings
· Go to Tools > Internet Options · Select the Privacy tab · Click on the slider under Move the slider to select a privacy setting for the Internet zone and move the slider towards the center to select Medium for your privacy setting
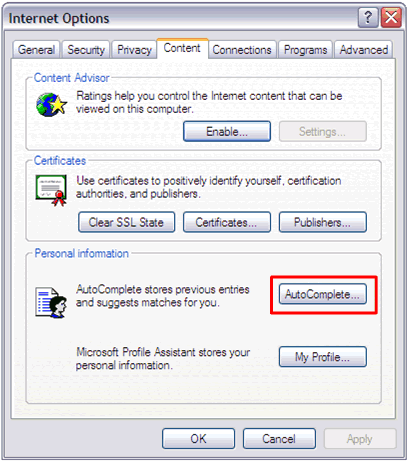
f. Auto Complete has been disabled (Having the username/password information automatically entered compromises the security of the system).
· Go to Tools > Internet Options · Select the Content tab · Under Personal Information, click the Auto Complete button. · In the AutoComplete Settings window, under Use Auto Complete for, uncheck the User names and passwords on forms check box.
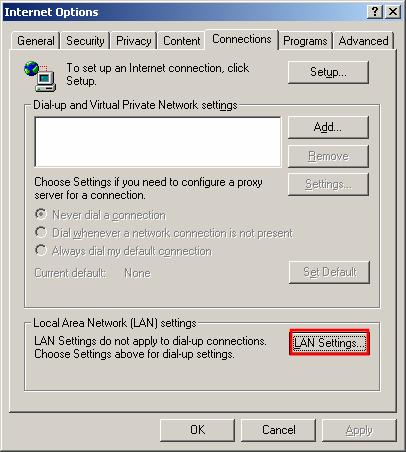
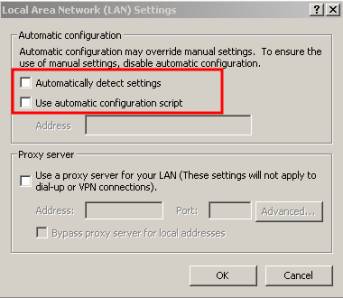
g. Checking Network Connections & LAN Settings
· Go to Tools > Internet Options · Select the Connections tab · Under Dial-up and Virtual Private Network settings review the internet connections selected for the PC
· Go to Tools > Internet Options · Select the Connections tab · Under Local Area Network (LAN) settings, click on the LAN Settings button · In the Local Area Network (LAN) Settings window, under Automatic configuration, uncheck Automatically detect settings and Use automatic configuration script · Click the OK button
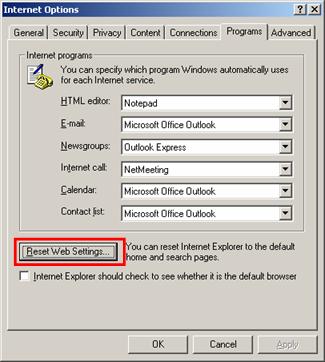
h. Reset Default Web settings for Browser
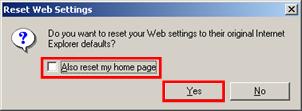
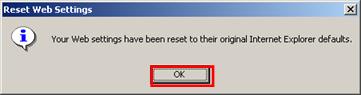
· Go to Tools > Internet Options · Select the Programs tab · In the bottom-left of the window click on the Reset Web Settings button · When the new window pops up, uncheck Also reset my home page and then click the Yes button · Click the OK button when prompted.
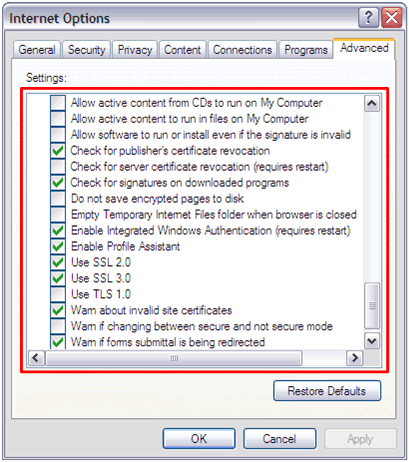
i. Update SSL settings
· Go to Tools > Internet Options · Select the Advanced tab · Click the Restore Defaults Button
4. Ensure that the Windows Operating system has all the latest patches and updates Obtain the latest patches and updates from the Microsoft Update site: http://update.microsoft.com/
|


|
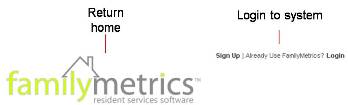
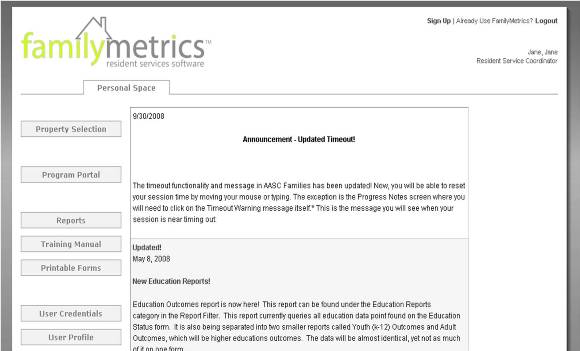
The above graphic is the FamilyMetrics homepage. For your convenience, throughout the entire site you will find five main navigation areas: A. The top-right navigation area is always visible and allows you to quickly login or logout of the system:
Home: Clicking on the FamilyMetrics logo will take you to the FamilyMetrics home page without logging out of the system (logging in/out will be covered in the next section). Login: Clicking Login will take you to the login page where you can securely login to the FamilyMetrics system. Logout becomes visible once you are logged in and it securely logs you out of the system in one click. B. The left navigation menu is context sensitive and will change according to the task that is being performed. The home page left navigation menu allows you to browse through the following content:
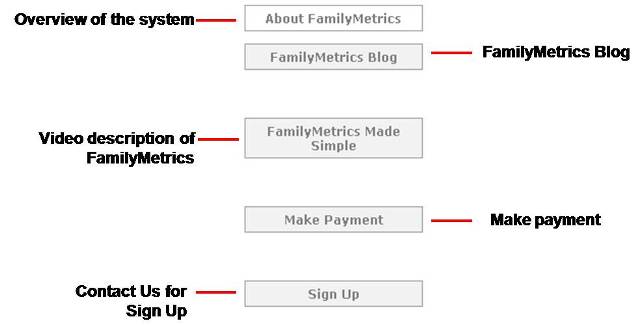
About FamilyMetrics: Overview of the FamilyMetrics system and its partners. FamilyMetrics Blog : Link directly to the FamilyMetrics blog. The FamilyMetrics Blog will be geared toward anyone interested in how FamilyMetrics can be used to help family resident services professionals improve service delivery, make better decisions, measure and report performance, increase funder confidence, and deepen community impact. Readers will use the FamilyMetrics Blog to stay connected, stay informed, and stay inspired. Blogs include: trends, news, creative inspiration, and the latest gossip at Pangea Foundation. FamilyMetrics Made Simple : Link to a short video describing the usefulness and impact of the FamilyMetrics system. Make Payment : You can use this link to pay your subscription to FamilyMetrics. Sign Up : Link to the "Contact Us" form on the FamilyMetrics.org product site. You can use this link to sign up for FamilyMetrics software including new Service Coordinators or new Properties. C. The top-navigation menu: Once a registered user is logged into the system, this menu area links to the following tools of the system: Personal Space, Property Home, Resident Files and Resource Directory. D. The body-navigation links: The links in this area give you access to specific files and tools within the task that is being performed. E. The bottom-navigation links: The links in this area give you access to many useful tools including:
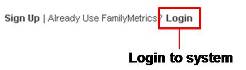
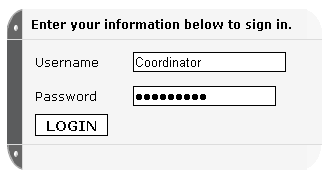
Terms of Use: Links directly to the Terms of Use. Acceptable Use Policy: Links directly to the User's agreement. Security Statement: Links directly to the Security Statement. Privacy Statement: Links directly to the Privacy Statement. Product Tour: Link to a short video tour giving an overview of the entire FamilyMetrics system. FAQs: Links to a Frequently Asked Questions document for users new to the FamilyMetrics system. Contact Us: Click on the Contact Us link to write an email message to FamilyMetrics technical support. It will open your default email application (e.g. Microsoft Outlook) and you will be able to type your message. After clicking the Login icon on the top-right navigation area, you will be sent to the Service Coordinator's secure login page. You must be registered as a user in order to login and perform the tasks that your user level permits.
Once on the login page, you will be asked to input your unique username and password. Note that, neither the username nor the password is case sensitive. In another words, inputting "Coordinator" is equivalent to typing "coordinator". For security purposes, please make sure not to share your password with anyone else, as this is the only identifier of the person who logs into the system.
Once you are done entering your username and password, you must click the LOGIN button to access the secure area of the system. This is accomplished by using a Secure Socket Layer (SSL), which is a protocol method of choice for securing data transmissions across the Internet. Whenever you see a "closed lock" in the activity bar of your browser, it means that a secure connection has been established and it is safe to send sensitive data through the Internet.
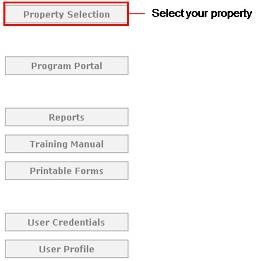
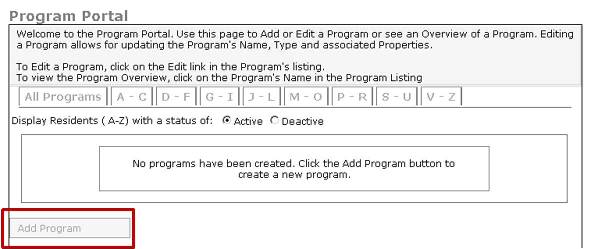
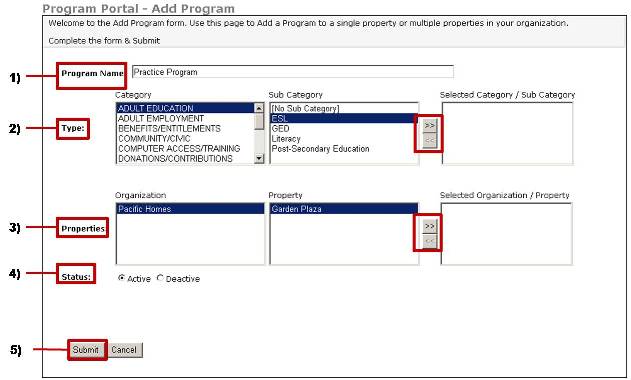
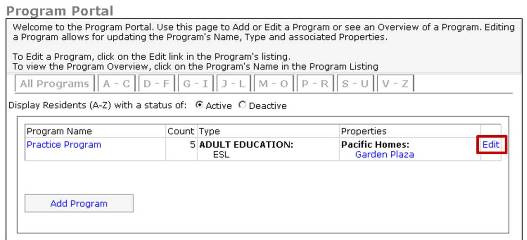
This will bring you to your Personal Space within the system. From your Personal Space you can select a property, create new Programs for a Property or Organization (Program Portal), run property or organization-wide Reports, view the FamilyMetrics training manual, print hard copies of the FamilyMetrics forms, change your username and password information (User Credentials), or update your User Profile.
Selecting you property is a 2-step process. Once you have logged into the system and you are in your Personal Space, follow these steps:
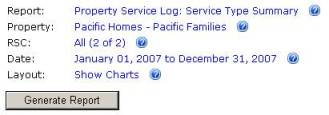
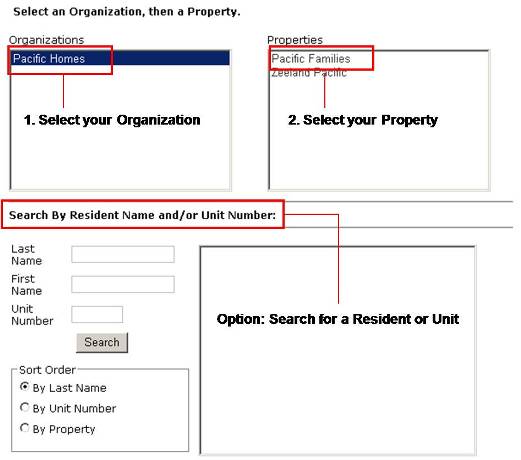
You will be given a selection menu that allows you to choose from all Organizations and Properties that you are authorized to work on. In the above example, this user is authorized to input content for two properties, Pacific Families and Zeeland Pacific, within one Organization, Pacific Homes. Note: From the Property Selection screen, you also have the option to search for a Resident or Unit number. Search criteria include Last Name, First Name or Unit Number (all fields are optional). You can also change the sort order of the results to be by Last Name, Unit Number or Property. This is a helpful tool if you are a Service Coordinator who works with more than one property. The following is the left navigation menu of the Property Home page:
|


|
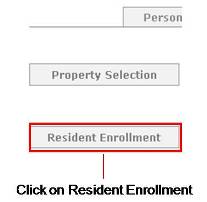
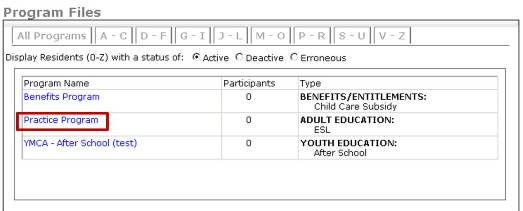
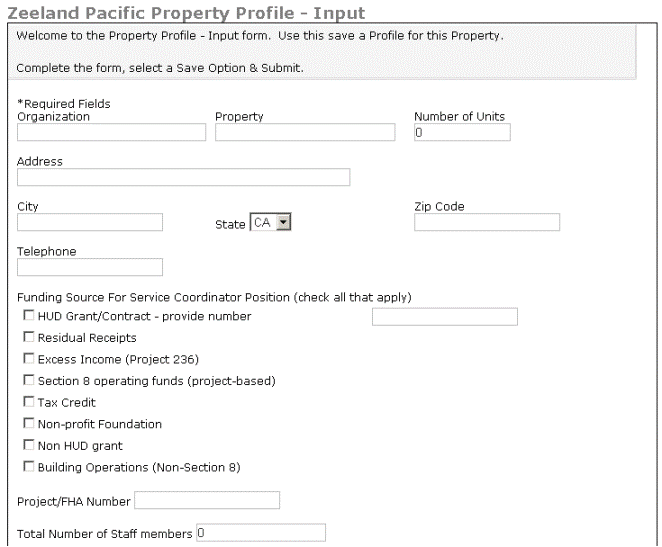
After logging into the system and selecting your property you are now ready to start creating Resident Files. (Selecting your property is explained in section 1.3) The Resident Files link is located on the top navigation menu that appears once you have logged into the system and have selected a property.
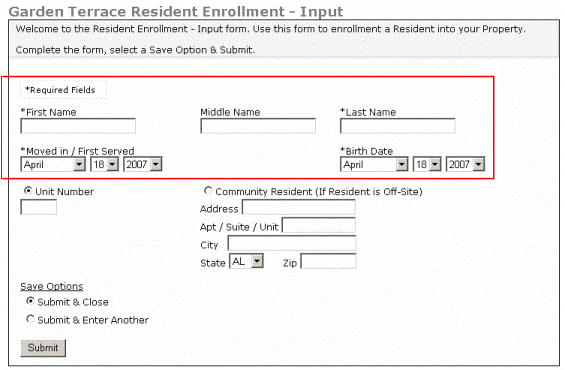
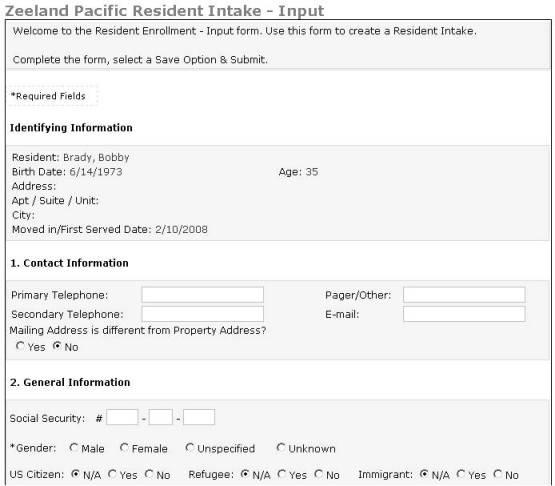
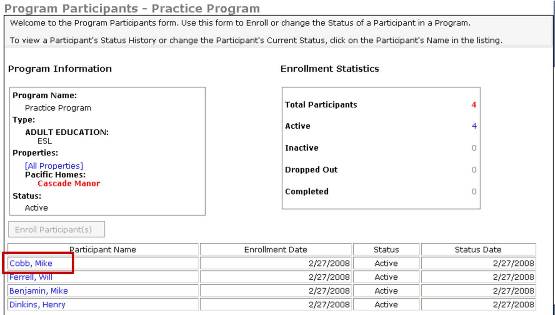
The first step in using the Resident Files is to populate your property by creating a Resident Enrollment for each resident on your property. To create a Resident Enrollment, perform the following steps:
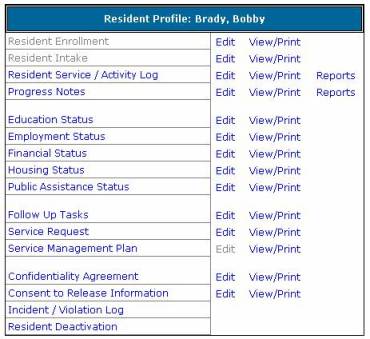
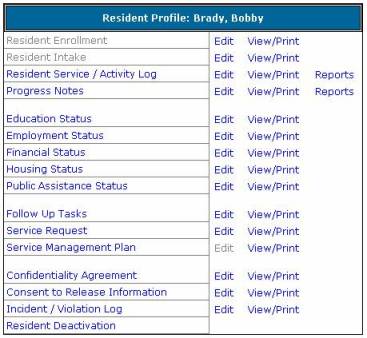
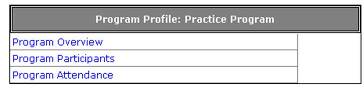
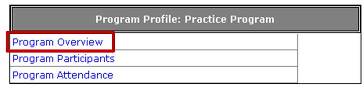
2.2. View/Edit/Print Resident Files The Resident Console
The Resident
Console provides access to all residents within the current
Property as selected from the Property Selection page. Users are provided
with two filtering methods: 1) Rolodex tabs and 2) Resident Status radio
buttons.
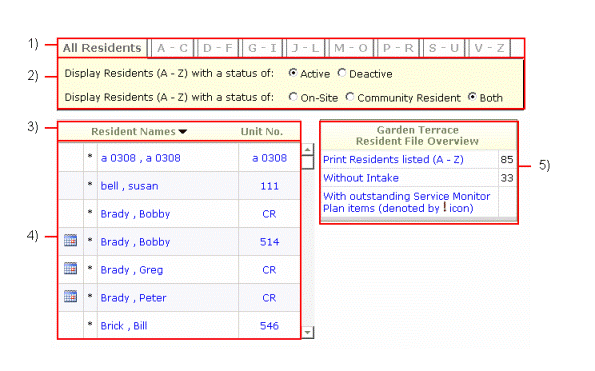
1) Rolodex Tabs: In order to filter the list of residents by last name, there is a row of tabs at the top of the Resident Files. These "groups" of letters allow the user to display only those residents with Last Names that begin with one of the letters within the selected tab's group. For example, the tab denoted 'A-C' would display only those residents whose last names begin with the letters 'A', 'B' or 'C'. 2a) Resident Status (Active/Deactive): You can filter the display of residents to include those with either Active (default), or Deactive status in the system by toggling the first Resident Status radio button. 2b) Resident Status (On-Site/Community Resident): You can filter the display of residents to include those residents who live on-site, community residents (off-site), or to display both (default) by toggling the second Resident Status radio button.
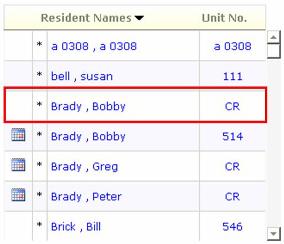
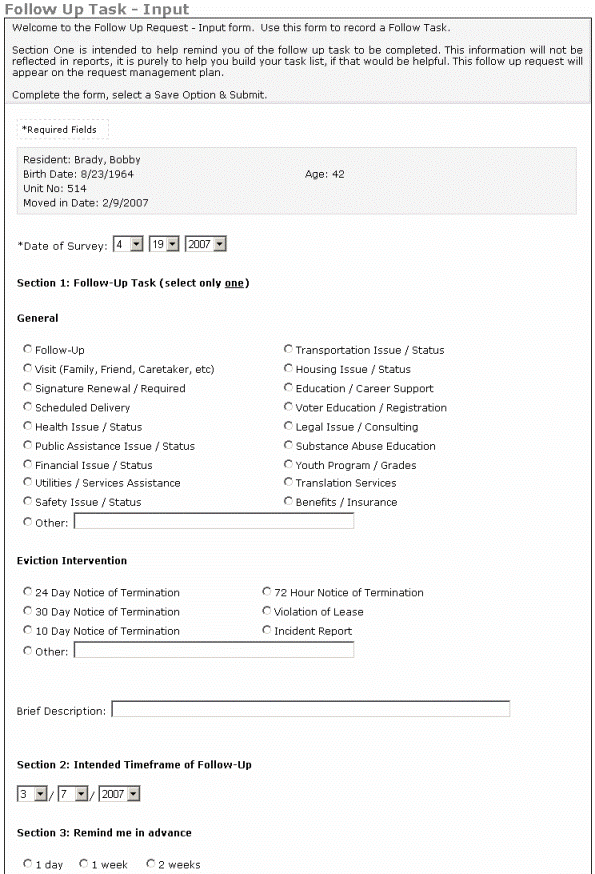
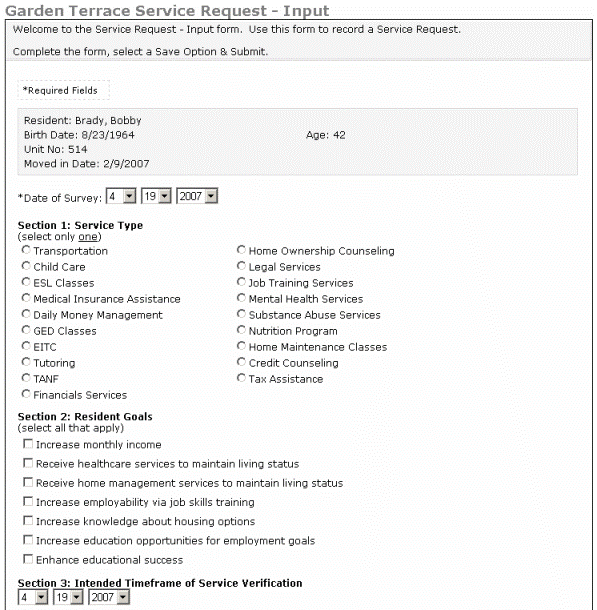
3) Column Headings: In addition to being able to select the group of residents and their status to display in the Resident Files, you can affect the sort order of the columns, "Resident Names" and "Unit No." by clicking these column headers. The sort order options are ascending (A-Z, 0-9) or descending (Z-A, 9-0). 4) Resident Listing**: This area displays the residents based on the tabbed-group of letters and their Status selected. Residents are displayed according to the sort order selected using the column headings. Each Resident's Name and/or Unit No. acts as a link providing access to his/her Profile. ** A calendar next to a Resident's name denotes a pending Follow-Up Task while an asterisk (*) next to a Resident's name denotes a pending Service Request. These are discussed in further detail in Sections 2.11 (Follow Up Task), 2.12 (Service Request), and 2.13 (Service Management Plan).
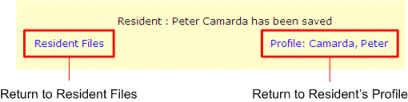
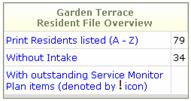
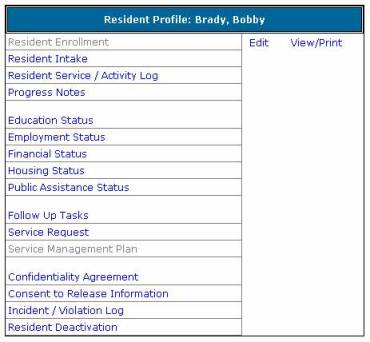
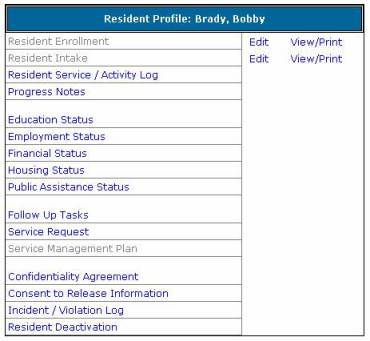
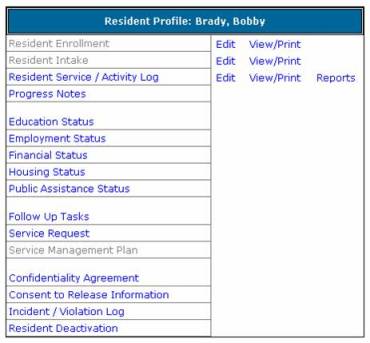
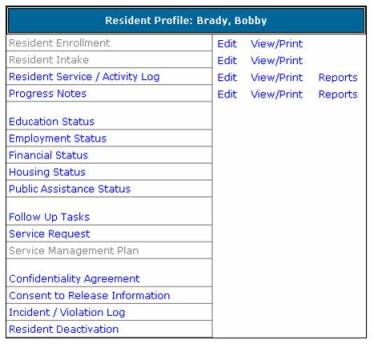
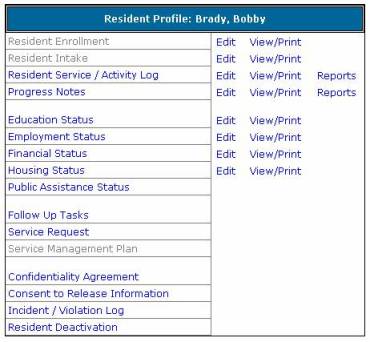
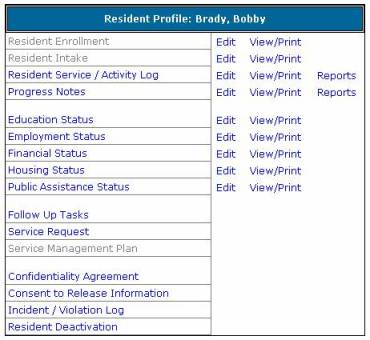
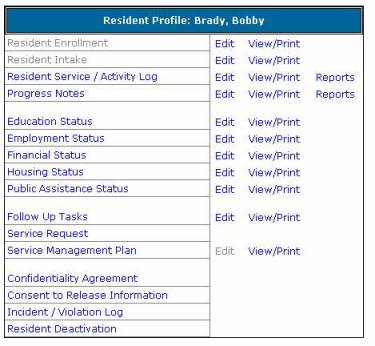
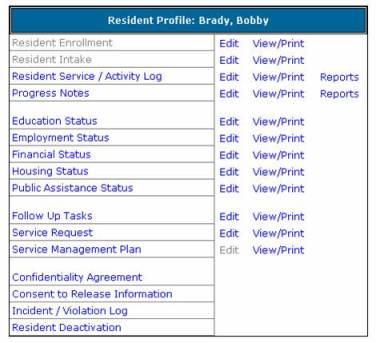
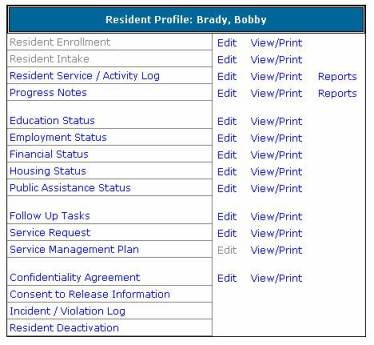
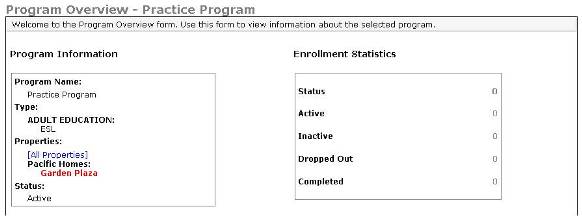
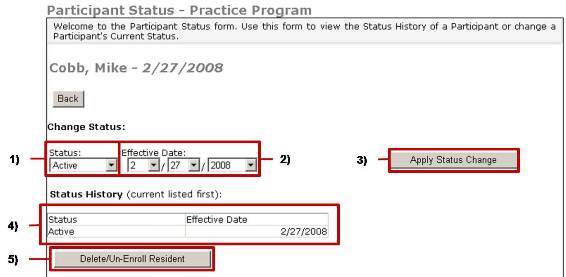
5) Resident File Overview: This section of Resident Files contains sub reports of all affected residents within a Property of a certain status, indicated by the name of the sub report. The first sub report listed, "Print Residents listed (A-Z)", generates a report of residents listed in the Resident Files for the state currently displayed (after choosing the Resident Status filters in the Resident Rolodex). These values can be used to provide service coordinators with the total number of residents within a Property (without requiring them to manually count each one in the list or use the Profile) and can also be used to report on residents of a certain status (such information could be all residents without a completed Intake). View/Edit Resident Information Once a Resident Enrollment has been created, that resident is added to Resident Files. To access the resident's Profile:
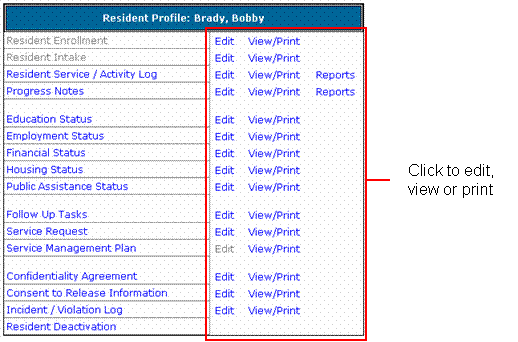
Once you select a resident's name, you will be able to identify which forms have been documented for that resident and either create, edit, or view/print additional information for that resident's Profile.
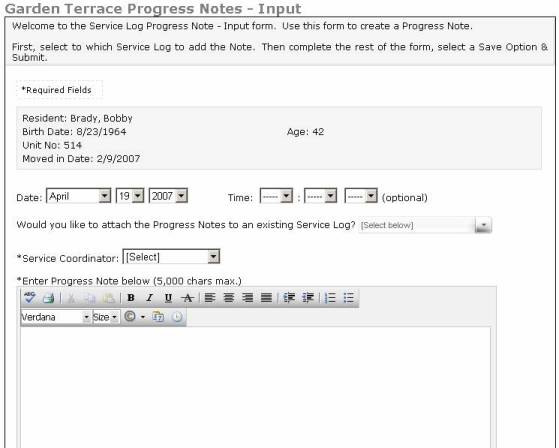
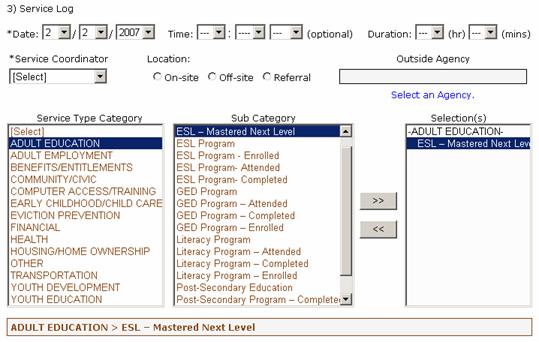
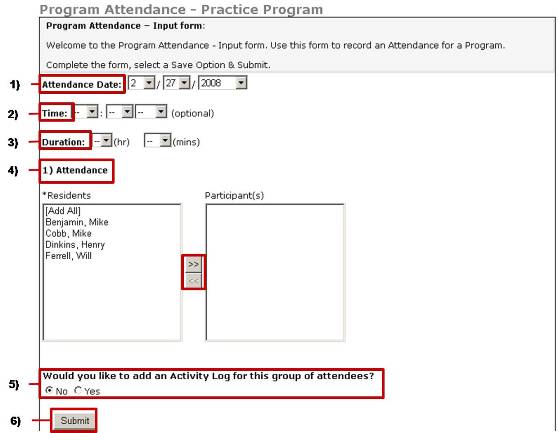
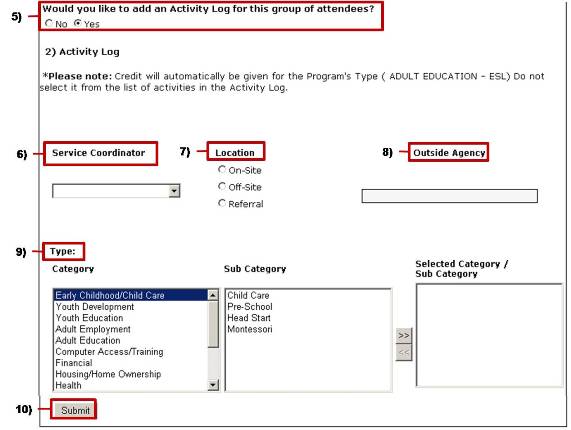
2.4. Resident Service / Activity Log Use this form to record the duration of services rendered to a resident. You may also add an optional Progress Note to the Resident Service / Activity Log. To input a Resident Service / Activity Log follow these steps:
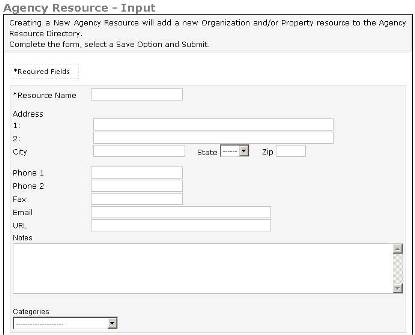
*Note that if you would like to list a new agency as the 3rd party referral agency for the services rendered, you must first add the agency in the Resource Directory and then return to the resident's Profile to complete the Service Log with the selection of the new 3rd party referral.
Only ONE Service Type Category may be selected but multiple Sub Categories within that Service Type Category may be selected. An unabbreviated description of the Service Type and Sub Category chosen appears in the box below the selection boxes (In the example below: ADULT EDUCATION > ESL – Mastered Next Level).
To input a Progress Note after creating its corresponding Resident Service / Activity Log click on Progress Note after saving the Service Log. Otherwise, follow the procedure described below.
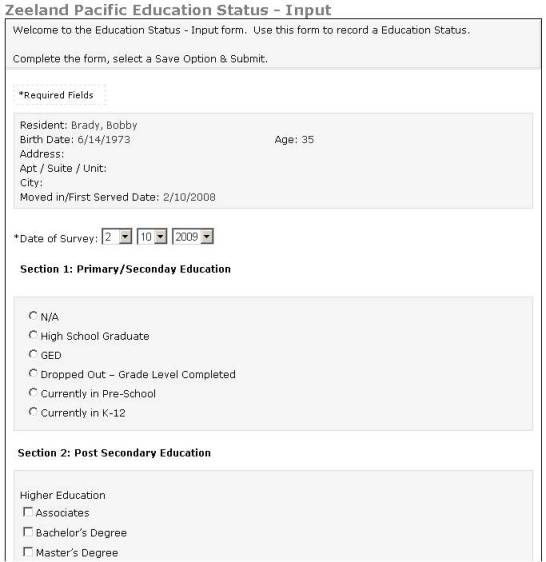
*Note: The RSC will create a new Education Status with a new date every time the resident's education information changes. When creating a new Education Status, the fields in the form will be populated with the most recently submitted Education Status form's information. To view an old Education Status, choose Edit in the resident's Profile and select the date of the Education Status you would like to view.
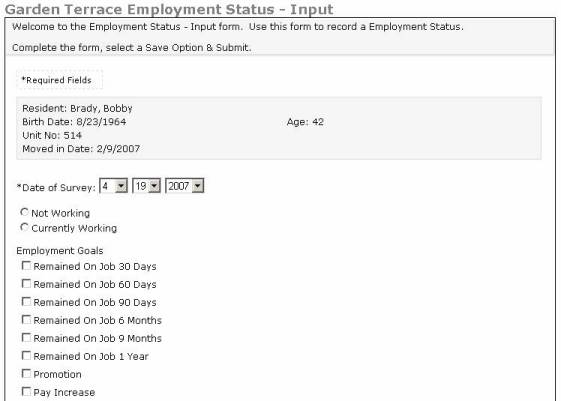
*Note: The RSC will create a new Employment Status with a new date every time the resident's employment information changes. When creating a new Employment Status, the fields in the form will be populated with the most recently submitted Employment Status form's information. To view an old Employment Status, choose Edit in the resident's Profile and select the date of the Employment Status you would like to view.
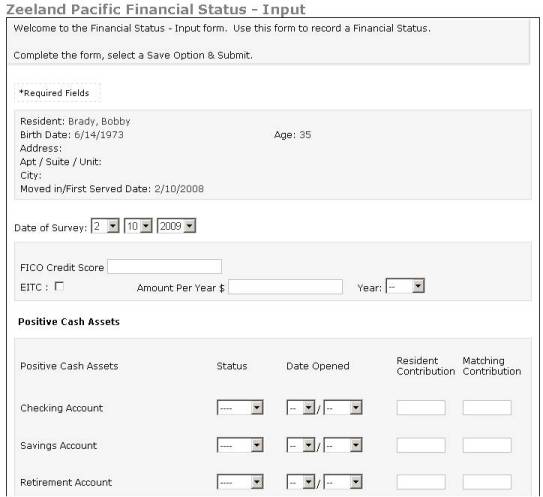
*Note: The RSC will create a new Financial Status with a new date every time the resident's financial information changes. When creating a new Financial Status, the fields in the form will be populated with the most recently submitted Financial Status form's information. To view an old Financial Status, choose Edit in the resident's Profile and select the date of the Financial Status you would like to view.
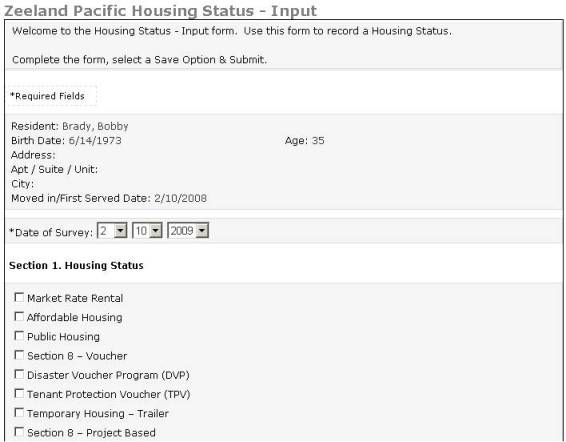
*Note: The RSC will create a new Housing Status with a new date every time the resident's housing information changes. When creating a new Housing Status, the fields in the form will be populated with the most recently submitted Housing Status form's information. To view an old Housing Status, choose Edit in the resident's Profile and select the date of the Housing Status you would like to view. 2.10. Public Assistance Status
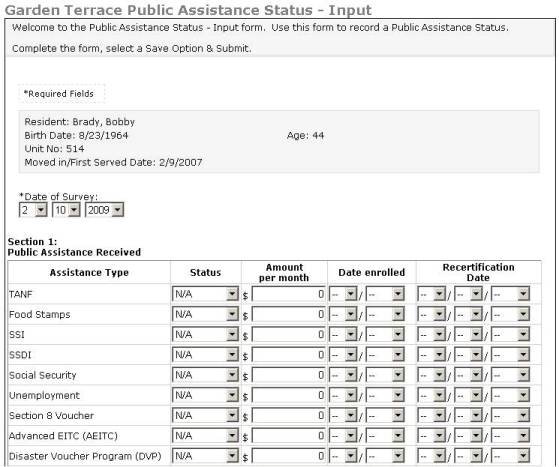
*Note: The RSC will create a new Public Assistance Status with a new date every time the resident's public assistance information changes. When creating a new Public Assistance Status, the fields in the form will be populated with the most recently submitted Public Assistance Status form's information. To view an old Public Assistance Status, choose Edit in the resident's Profile and select the date of the Public Assistance Status you would like to view.
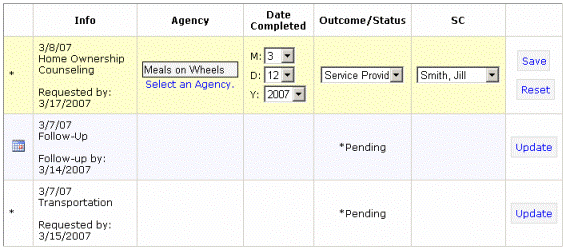
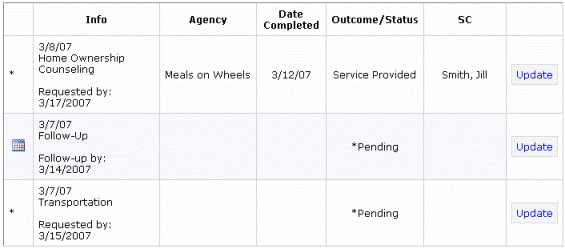
1) Service Management Plan link - this allows you to indicate Service Outcomes and completion dates for all items selected within the Service Request and Follow Up Task form(s). 2) View/Print link - this displays the status of all items selected within the Service Request and Follow Up Task form(s).
Determine the item you want to record a Service Outcome for, and select the Update button for that item. Service Requests are denoted by asterisk symbol (*) while Follow Up Tasks are denoted by a calendar icon.
Now click "Select An Agency" (if the service is being met by an outside agency listed in the Resource Directory). Then choose the date that the service action took place, the status of the service request/follow up task, and the SC who aided the outcome. As you complete each section, the data is placed in a "holding tank" on the screen until you click Save.
If you should need to change the referring Agency, the date of completion,
or the outcome in the future, simply select
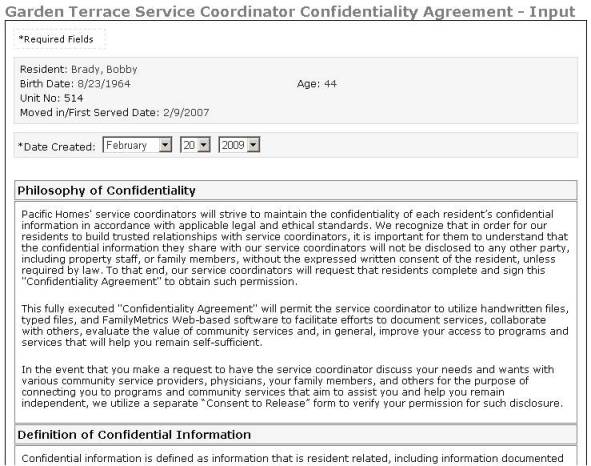
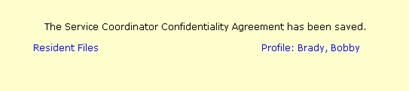
"Update" for an item in the SMP in order to edit its contents. *Note: If a resident has a pending Service Request, an asterisk symbol (*) will continue to appear next to his/her name in the Resident Files Console until a different outcome/status is chosen in the SMP. Similarly, a resident with a pending Follow Up Request (and a "Remind me in advance" date falling on our before the current date) will continue to have a calendar icon appear next to his/her name until a different outcome/status is chosen in the SMP. 2.14. Confidentiality Agreement
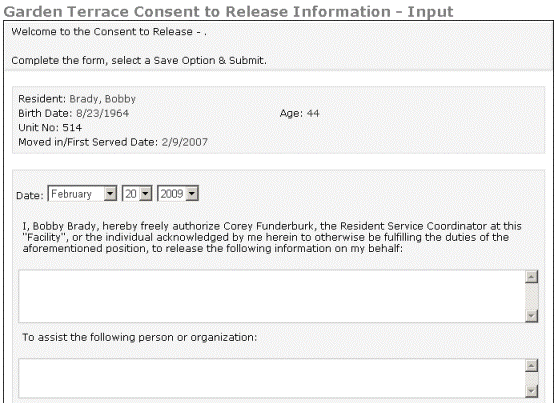
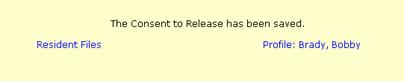
2.15. Consent to Release Information
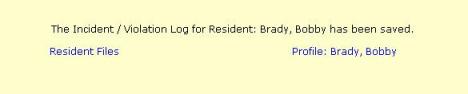
2.16. Incident / Violation Log
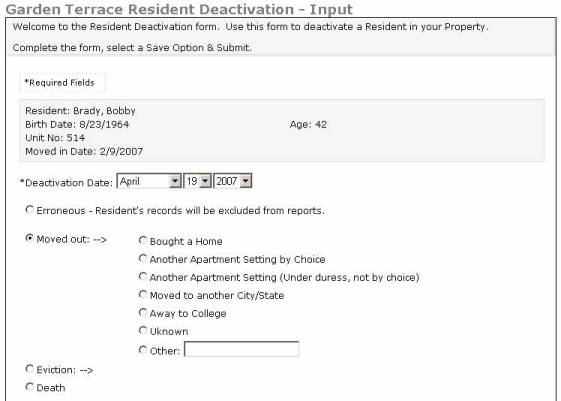
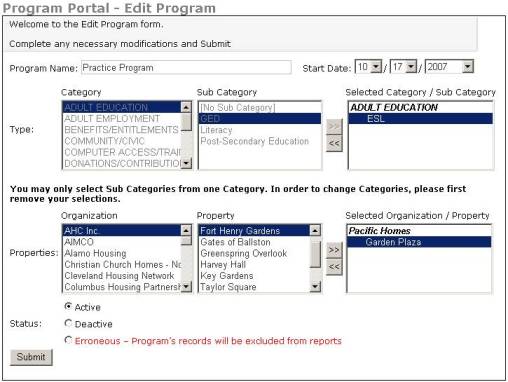
*Note: Selecting Erroneous for the deactivation reason will exclude the resident's records from being included in any future reports.
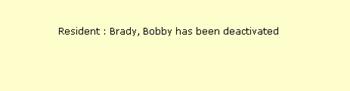
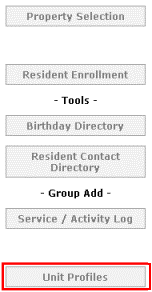
2.18. Resident Tools: Birthday Directory The Birthday Directory allows you to view the Birthdays of all of the residents on your property in one place. Using the Birthday Directory, you can filter and sort residents by birthday to generate a monthly Birthday reminder/list.
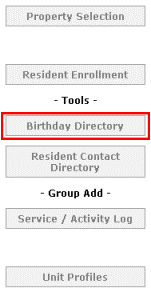
2.19. Resident Tools: Resident Contact Directory The Resident Contact Directory allows you to view the telephone numbers and email addresses of all of the residents on your property in one place.
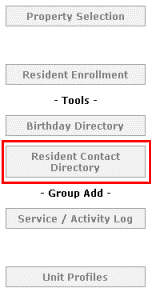
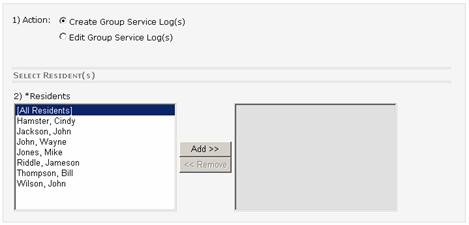
2.20. Group Add: Service / Activity Log The Group Add functionality allows the RSC to create identical Service / Activity Logs for multiple residents instead of having to create individual Service / Activity Logs for each resident.
*Note: Editing Restrictions - Group Add Service /Activity Logs can only be edited from the corresponding Group Add screen. They cannot be edited from an individual resident's Profile.
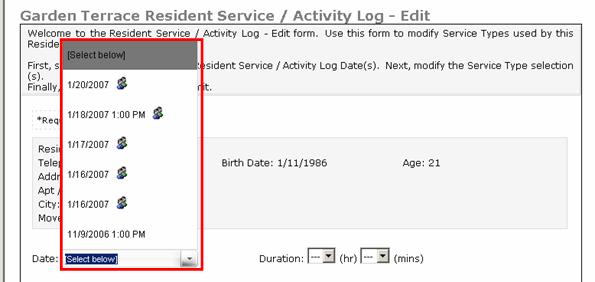
Note: Icons - In order to differentiate between regular or Group Add Service Logs in a resident's Profile, icons (as seen above) appear next to the dates of all Group Add Service Logs. These date drop-downs appear in the Edit screen of an individual resident's Service / Activity Log. The Unit Profiles allows you to view the residents for a specified Unit(s) and basic summary information for these residents including: Unit Number, Name, Gender, Living Status, and Age.
|


|
Once you have logged in and selected a property:
|


|


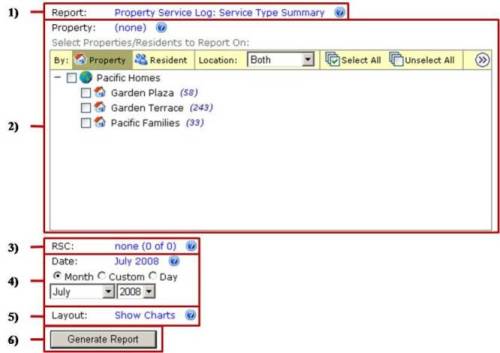
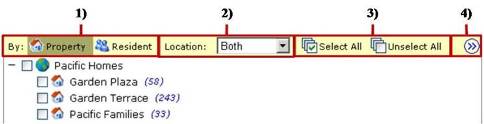
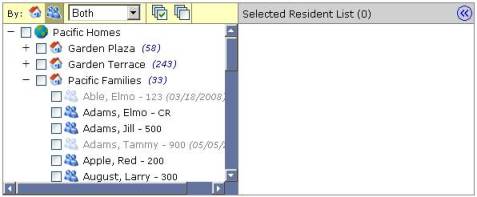
6.2. Properties/Residents to Report On
6.3. Making Changes to a Generated Report
6.4. Printing a Generated Report
|